|
Now that the school year is ending, I wanted to combine some of what I've learned into a big project. I decided to use Photoshop, Premiere Pro, and some of Illustrator in this project. A few of my friends and I brainstormed ideas for a video, filmed it over two days, and I edited the whole thing over a few days into a 15 minute long video. The video is a parody of the "Top Ten" genre on YouTube. In our video, we counted down the top ten letters of 2018 so far, and aimed at making the video comical for a wide group of people. My friends and I are proud of how it turned out, and we hope to make more videos in the future.
0 Comments
On July 25, 2017, Epic Games released Fortnite, a co-op sandbox game made for PC, PS4, and Xbox. The game originally was not that popular, and got mediocre reviews. Later that year, Epic Games released a "Battle Royale" mode to their game. For a while, the Battle Royale mode was also not very popular, but by around February of 2018, the game started gaining a lot of popularity. The Battle Royale mode itself is free, and the original game costs $30, but the Battle Royale has microtransactions, which is how Epic Games has made most of their money off of Fortnite. The battle royale mode is a free for all mode with 100 people all fighting to be the last man standing. You can team up with 1-3 friends in Duos or Squads mode and fight other teams as well. The game starts off with everyone dropping into the map and looting what they can, and as the number of players drops, people get better weapons and the play area shrinks. Fortnite is fun to play by yourself and with friends, and if you have the Battle Pass, the challenges will keep you playing.
The most recent tool I have learned to use in 3D Studio Max is the material editor. So far, some things are confusing, and I wanted to get better at it, so I looked up tips and basic information on the material editors in 3DS Max. The first and most obvious thing is you can press 'M' to open the material editor. This is useful for quicker material editing. The second thing I learned is the difference between the Slate and Compact material editors and how to alternate between them. The material editor I use mostly is the Slate editor. In this interface, you connect nodes together and position materials and such to create the textures you want. The Compact editor shows you a preview of you materials and is more simple. Each has their own advantages. The Slate editor is more direct and editable, while the Compact editor has more presets and is quicker and easier to use.
https://goo.gl/qNBRkg 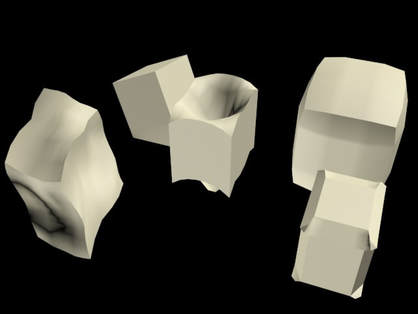 I recently explored modifiers in 3DS Max and was able to create some interesting things on my own. There is a wide variety of modifiers to use and they are all very useful. I used a few different modifiers on each cube besides the edit poly modifier. I used push, displace, chamfer, ripple, noise and bend. Modifiers such as chamfer, bend, and push were more simple and created smaller changes, while ripple, noise, and displace created more obvious changes to the cubes. As you can see in the image, the leftmost cube and center cube were most drastically affected, while the furthest cube and the cube in the top right had more simple modifiers applied.
Recently, I started working in a software for 3-D modeling, known as 3-D Studio Max. I have had to learn how another new software works, and I'm trying to get better at it. I wanted to research keyboard shortcuts that might be useful for getting quicker in 3-D Studio Max. Some keyboard shortcuts I learned were toggle snap and select object. When you want to select an object, it is not very convenient to click the selecting button, so you can press 'Q' to switch the cursor to select object. The other shortcut turns on and off the snap for the 3-D grid. This is useful for me because I like to be exact and consistent. By pressing 'A', you can easily toggle the snap on and off. The last keyboard shortcut I learned was select and scale. By pressing 'R' you can scale what you have selected.
In class, we recently started working on a team project. I have had to plan with others on how to make a final product and we had to divide the work. The different people in the groups had different jobs, and my job was to create the graphics and logos. I decided to research ways to improve logos and graphics for a video. I found that a good technique to use is to combine an image with text. It gives a sense of cleverness, as you can combine a symbol for your company with text. Another tip I found was to pick colors carefully. Colors are very important in giving your logo the feel you want. The last thing I learned was to not make a logo too complex. You want it simple enough to be understandable, but also complex enough to be creative. Logos that are too complex will be confusing and hard to understand and logos that are too simple will look pointless and effortless.
In Premiere Pro, I have been experimenting with new tools and effects in Adobe Premiere Pro. I wanted to research how to edit effects and see what certain effects can do. I researched the volume effect and the pitch shifter effect. First, to add an effect to part of your video, you simply have to find it and drag it onto the section of video you're trying to edit. With the default workspace, the effects are in the bottom left. There is a drop down for different types of effects, such as video effects or audio effects. On the panel in the upper left hand corner of the default workspace, you can edit the effects. With the volume effect, you can easily slide the volume up and down up to an extra 6 dB or 287.5 dB less. The pitch shifter effect is a bit more complicated. There is the option to use a custom setup for the effect, or you can use a slider to adjust the pitch. The slider adjusts the ratio in which the pitch is shifter. It goes from a ratio of 0.5 to 2.0. Together, these effects can be used to perfect audio in videos made in Premiere.
helpx.adobe.com/premiere-pro/using/applying-removing-finding-organizing-effects.html Once again, I have made a video in Adobe Premiere. I used bits of a conversation to create an interaction between two people. The video is below. Most of the camera angles are shots and reverse shots, with the exception of one. While using Adobe Premiere, I have started to learn how to use composition with film techniques as opposed to just art techniques. I wanted to look up good usages of different shots, and when to use them. Specifically, I researched the bird's eye view and the point of view shot. Good times to use the bird's eye view are when you want to show off an area from above. A lot of the time, the bird's eye shot is used to show grief or foreshadowing. Another common use of the bird's eye shot is showing a scene while it is raining. The point of view shot is used during horror films often so that the viewer feels scared. In general, point of view shots are used during a specific part where the director wants the viewer to feel what a character is feeling. When used correctly, both of these shots can enhance videos greatly.
https://www.premiumbeat.com/blog/power-point-view-pov-shots/ In class, we started working in Adobe Premiere. I've had to learn about a new workspace and learn how to use a few new techniques to be able to make a new form of digital media. The video I made was a simple slideshow of images increasing in the intensity of the same color. The images were mostly pink, and as the video progressed, the pacing changed and the colors got more vivid. I started off with a very light pink image that featured nature, which is calm. The first few images were of nature, and as the video progresses, there are more things going on. The images change to more of human things, including power lines, a person, and lights, as the pink color gets brighter and more vivid. I researched some ways that videos can get more intense when I made this and I researched some about colors getting more intense. I used these techniques in creating my image.
Link to video: https://www.youtube.com/watch?v=yoAugSReAyo&feature=youtu.be
https://kzoinnovations.com/3+Ways+to+Make+a+Powerful+Video Mariokart is a very popular game series that has existed since 1992, with the release of Super Mario Kart for the Super Nintendo Entertainment System. Mariokart games are games made by Nintendo with characters from other Mario games, but instead of being an active story/puzzle game, you race with other people or with computers. Over the years, Mariokart has developed and changed greatly. New items have been added to use while you race, new characters, new maps, and new game mechanics have all been added to make the Mariokart series as fun as possible. In 2014, the newest Mariokart game was released for the Nintendo Wii U, and later in 2017, Mariokart 8 Deluxe was released for the Nintendo Switch. Mariolart 8 Deluxe was the same game as Mariokart 8, but it was for Nintendo's new console, the Nintendo Switch, and included all of the downloadable content that was released after Mariokart 8. Mariokart 8 Deluxe is fun to play, and is greatly balanced for all types of players. Unlocking new parts to use is very fun, and completing every Grand Prix is satisfying and fun. Mariokart 8 Deluxe also offers many online features, such as Tournaments and Battles. These modes are just as fun, and you can play with your friends no matter where they are. Overall, Mariokart 8 Deluxe is a great game, with great graphics, and great online features for multiplayer, and you don't have to pay for downloadable content.
mariokart8.nintendo.com/ |
